Game Changing Tips for iPhone
Have you ever wondered if there were any iPhone tips out there to finally get your phone organization under control?
I am way too excited so I just had to give you all a sneak peek at some of the goodness inside my new digital course Organize Your Digital Life Once and for All! I’ve been working like crazy to get all my organizing secrets for organizing your digital life all in one place. And phone organization is just the beginning! With this new course, I walk through everything from organizing your photos, to managing your email, to backing up your files, and more. You’ll also learn how to maintain these systems to stay organized for the long haul.
I’ve been so eager to get this course going that I thought I’d share with you all just a little taste of some tips you’ll find in the Organize Your Digital Life course. And what better place to start with tips than something we all use multiple times a day – our phone! Everyone could use a little help with phone organization, am I right?
You can check out the video below to see me walk through these tips on my own iPhone (hey to all the visual learners out there! ?) Otherwise, read on to discover my top game changing tips for iPhone.
iPhone Tip #1: Searching for an App
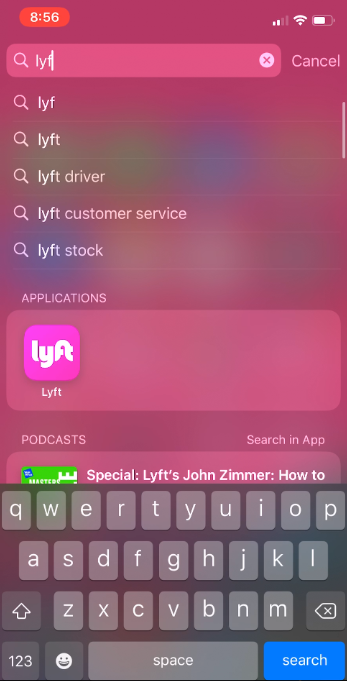
Did you know there’s a search bar for your apps? This is one of the best ways to find things on your phone, especially if you have a lot of apps to sift through or have chosen to organize your apps inside a lot of folders, by priority, or by color.
Instead of swiping and poking around your phone, just search for the app you need! It’s quick, easy, and all you have to do is swipe down from the home screen. (Or, if you are on an iPhone older than the iPhone X, swipe up from the bottom.) Once you swipe down, your cursor will already be on the search bar and your keyboard will automatically pop up. Simply type the name of the app you want to use, and it will appear right under your search bar. Most of the time, you don’t even have to type the full name of the app before it pops up.
iPhone Tip #2: Edit the Control Center
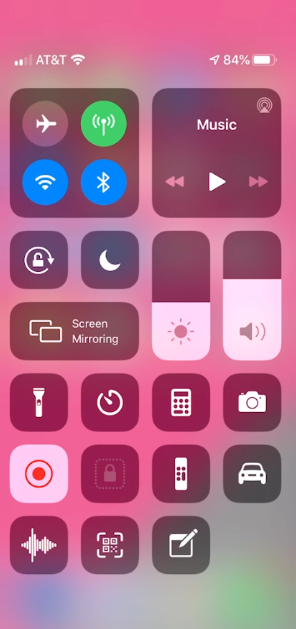
Maybe some of you are thinking: my iPhone has a control center?! Don’t worry, you’ve probably been using it without even knowing what it was called! The control center on the iPhone is the menu that pops up when you swipe from the top right corner down. Here, there are a couple quick menu options and references like volume, brightness, internet settings, and your tools such as flashlight and camera. If you’ve not been utilizing this little menu, then this tip is really going to be a game changer for your phone organization!
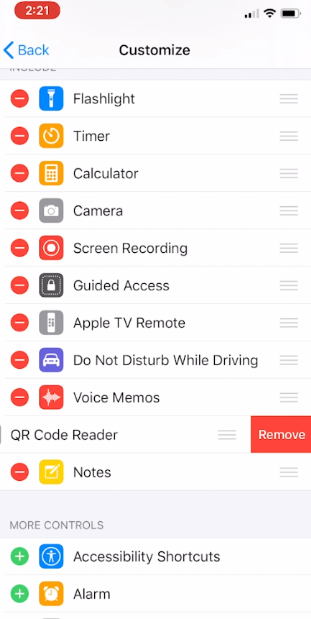
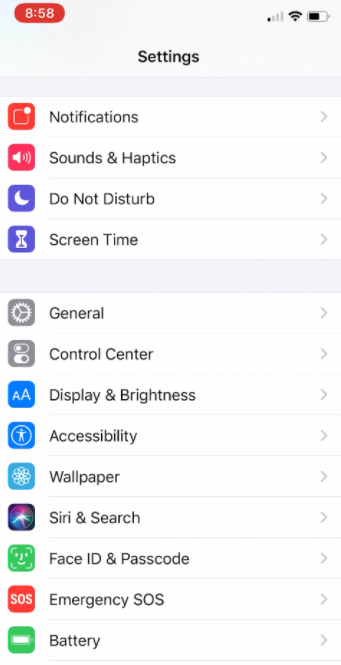
While the control center menu itself may be on your everyday radar, the big tip that not a lot of people know is that some of the settings and tools in your control center can be changed or customized. The way to select what is in your control center is to go to settings > control center > customize.
There are many tools you are able to add and take away from your control center and you can make it a powerful quick key to your most used tools. You’ll see the tools on your control center at the top, and the ones you can add under that. Add a tool by pressing the + beside it, remove a tool by swiping right on it and tapping “remove.” It’s that easy!
Most of the tools on your command center can be activated with a tap. For example, tapping the flashlight once will turn the flash light on or off. But, here’s another secret, many of these tools have more options if you press and hold. To continue with my previous example, tap and hold the flashlight button to adjust how bright the light is. Many of the tools in your control center have this option. Try seeing what else your tools can do! (One of my favorites is to tap and hold the camera to select what mode I’ll be taking pictures in.)
Using the control center to its full potential and customizing the tools to fit your needs is a key way to kick start your phone organization!
iPhone Tip #3: Autocorrect
It’s safe to say that most of us know what autocorrect is – and it’s not unique to iPhones! But autocorrect is not just for correcting words you misspell! You can use autocorrect to make your own shortcuts for words or phrases you type all the time. For example, if you often type your email address, jane@gmail.com, you can add a shortcut that is labeled “j.g” and every time you type “j.g”, your phone will autocorrect to your full email address.
Find your text replacement shortcuts by going to settings > general > keyboards > text replacement.
This is great for shorting those phrases you type all the time and can really speed up productivity. But be careful not to use phrases that occur often or naturally. You wouldn’t want a shortcut that is “he.” because every time you type the word “he”, your phone would still correct that to your shortcut phrase. (Which, quite honestly, could get quite annoying! A big part of phone organization is letting technology do the hard work!)
iPhone Tip #4: Rearrange Apps
Next up are the four apps at the bottom of your screen. Did you know these are customizable? Simply press and hold on any one of your apps until they begin shaking. This allows you to move your apps around. After you’ve entered the edit mode, drag and drop the apps you’d like to either remove or add to the menu. It’s that simple!
iPhone Tip #5: Screenshots
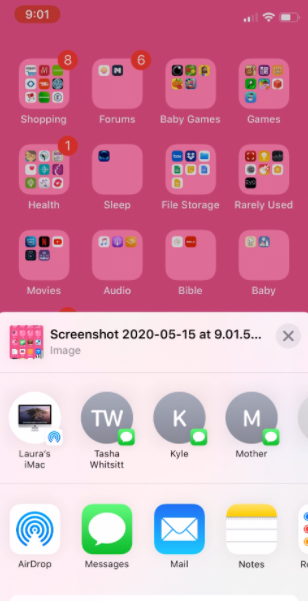
I use screenshots all the time. Seriously! if I see a book I want to add to my reading lis or see something online I want to quickly share, I just take a screenshot and bam! I can move on with my day. Just hit the power button and the volume up button at the same time and there you have it – your phone takes a photo of your current screen. Once the screenshot is taken, your phone automatically gives you some options. You can immediately choose to send it to others, save it, print it, or even mark it up.
iPhone Tip #6: Record Your Screen
One of the tools you can add to your control center is for recording your screen. When you add this to your control center, all you have to do is press the button and you can record your screen at any time. The default for this is to record without audio, but if you tap on the button and hold, you will get extra menu options allowing you to add audio to your recording. Pretty cool, huh
iPhone Tip #7: Airdrop
The Airdrop feature is a feature I use almost daily – I can’t recommend it enough. This allows you to communicate effortlessly between your Apple devices (or any Apple device close by). Make sure Airdrop is enabled (your bluetooth should be turned on), and then you can choose to share your files across your Apple devices whenever you click the share icon. When sending to a Mac, the file will automatically download to the computer. When sending to another iPhone, the recipient must accept the Airdrop in order to receive it, so no need to worry about something you don’t want being sent to your phone.
iPhone Tip #8: Copy and Paste
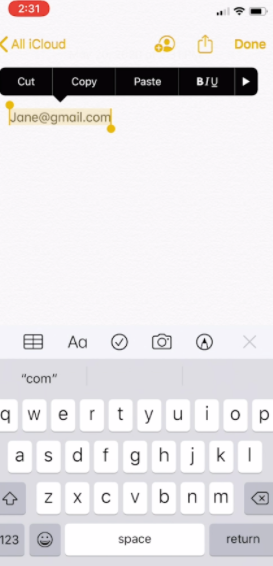
My final tip is good old Copy and paste. You can copy and paste on your phone just like you would on your computer! Tap and hold over the words you want to select. Your phone will automatically guess what you want to select, but it’s easy to adjust the markers if it’s ever wrong. Once selected, a menu pops up to make copying and pasting as easy as a tap!
I hope you found these iPhone tips helpful and learned something new! What are your favorite iPhone tricks? I’d love to hear about them in comments! And, if you loved this post and want to see a similar post for Android phones, let me know that as well. If there’s enough requests, there may be an Android version in the near future.
If this was helpful, there are even more tips like this as well as complete systems for how to get your digital life back on track with my course Organize Your Digital Life Once and for All! Be sure to check it out!








 Copyright 2024, Get Organized HQ.
Stacey Posey Says
Look forward to the Android tips I *hope* you will do 😉
Katie Hoinacki Says
While texting you can add or correct by holding curser and dragging where you need to add, say a letter “ I “ without deleting!
Elizabeth Goldwire Says
I knew about several of your tips, but I learned a few new ones also. However, I have an iPhone 8. Your first tip doesn’t seem to be available to me. I swiped in every direction. When I swipe up, I get the control center, even if I swipe from the corners. If I swipe down, I get the Notification Center, period.
Any suggestions, or is this just not available on the 8? I’d love to have the app search option.
Beth
Lou Says
Try swiping down from the center of the screen, not the top.
Elizabeth Goldwire Says
Thanks, that helped!
Sarah Preston Says
I LOVE Assistive Touch! You can customize it like you can the control center, and my favorite customized buttons are “mute,” “screenshot,” “lock rotation,” “app switcher,” and “control center.” I seem to be all butterfingers some days, so being able to one-touch assistive touch and the one-touch screenshot (or any of the other ones) is a lot easier for me than having to push two buttons at the same time. I’ve turned my phone off soooo many times trying to take a screenshot by pushing the power button at not-quite-the-same-time as the home button lol!